Completion requirements
View
There is no “one size fits all” answer to the question which user roles are required and what rights they need. It depends on each individual use case and country. Defining the roles is an important step of the initial requirements gathering and planning process when starting a SORMAS implementation project.
In this chapter you will learn how to create and edit different user roles exactly to your individual needs.
To access the rights & roles management section you need to be logged in to SORMAS with a user account that has at least the following rights:
- View existing user roles
- Edit existing user roles
You can access the user role management by clicking on “Users” in the main menu and then “User Roles” at the top navigation. To create a new user role, click on the “New User Role” button in the top right.
The following pop up will appear:
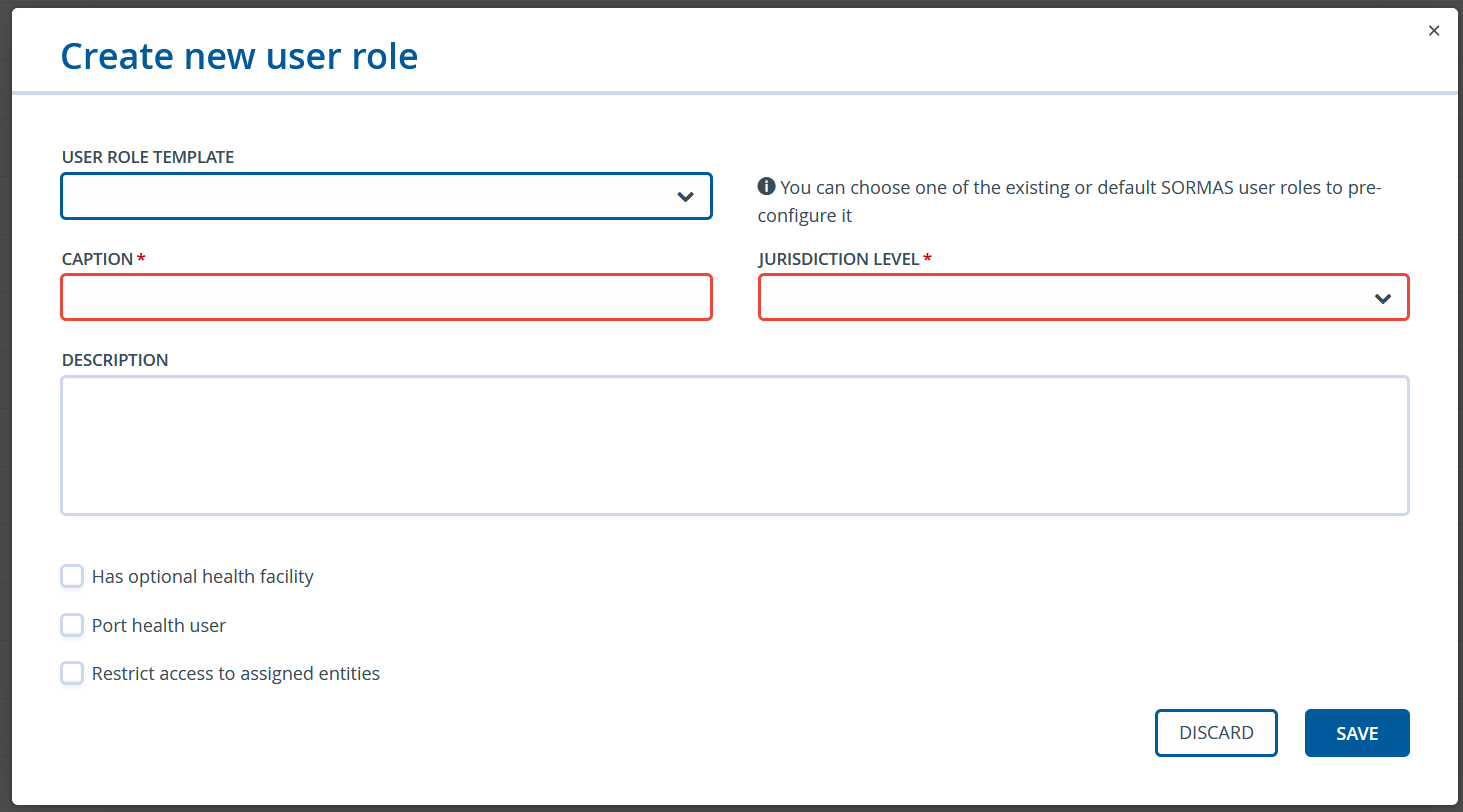 |
User Role Template
You can select an already existing user role as a template. This step is optional.
If you select a role, the new role you are creating will be prefilled with the same rights as the one you selected here.
Caption
The name under which the user role will show up in the user interface.
Jurisdiction Level
This selection can be used to restrict the access to specific levels of responsibility. For example, if the user role is only supposed to be used for workers of one hospital, school, critical infrastructure, etc., but they should not be able to see anything else, you would set the jurisdiction level to “Facility” (you will be able to select which facility exactly later, so no need to create one role for each facility, don’t worry). Here is a full list of all the jurisdiction levels:
| Level | Description |
| None | No restrictions apply. Be very careful when assigning this level! |
| Nation | Users will see all data connected to their own country. Please note: In most SORMAS setups, this is effectively the equivalent to “None”. |
| Region | Can only see data that where the “Region” field of “Responsible Jurisdiction” is set to the same value as the user. |
| District | Can only see data that where the “District” field of “Responsible Jurisdiction” is set to the same value as the user. |
| Community | Can only see data that where the “Community” field of “Responsible Jurisdiction” is set to the same value as the user. |
| Point of Entry | Can only see data that is connected to the same Point of Entry (Seaport, Airport, Border Checkpoint, etc.) as the user. |
| Facility | Can only see data that is connected to the same Facility (Hospital, School, etc.) as the user. |
| Laboratory | Can only see data that is connected to the same Laboratory as the user. |
| External Laboratory | Can only see data that is connected to the same Laboratory as the user. (While this is effectively the same as "Laboratory" it is used to be able to distinguish between users from internal and external laboratories) |
Important:
The jurisdiction level is applied in combination with the actual user rights.
Example:
If the user does not have the right to “View Cases”, they will not be able to see any cases, even though their jurisdiction level is set to “None”. Vice-versa if you have the right to “View Cases” but your jurisdiction level is set to “Community”, you will only be able to see cases from your community.
Description
You can provide a description of the user role for other administrators. We recommend to provide a small summary of the target audience of this user role, its purpose and the rights it grants in general.
Has optional health facility
If you check this box, you will be able to assign a health facility to all users that have this role.
An example of a use case for this checkbox would be if someone is responsible for regional surveillance but also needs access to data from a specific hospital from a different region.
Port health user
Same as “Has optional health facility” but for Points of Entry.
Restrict access to assigned entities
This checkbox can be used if you want to restrict access from a user to destructive actions like deletion of datasets. If a user has the right to delete entities, but this checkbox is checked in addition, they will only be able to actually use their delete right on entities where the user is specifically assigned as “Supervisor” at the case level.
If you click on “Save” the new user role will be created and you can see it in the list of all roles.
Now let’s move on to assign the rights to your newly created role!
You can open any user role by clicking on the UUID in the table. If you do, a popup will appear where you can set the rights. You will recognize the different categories of rights you learned about in the previous chapter.
In each category you can select from a range of different rights. Go through the whole list and select the rights you want your role to have.
After saving, you are ready to assign your custom user role to a user account. We will learn more about how to do that in the next chapter.
Important:
There are two extremely important user rights. Without at least one of them the user will not be able to access SORMAS at all.
Access SORMAS UI - Only if a user has this right they are able to access the graphical user interface.
Access SORMAS REST - Only if a user has this right they are able to authenticate against the SORMAS REST API
In most cases you will need the right “Access SORMAS UI” for human users. “Access SORMAS REST” is mostly relevant for system users that are being used for interoperability with other systems. In either case, if you do not provide at least one of these right, the system will display a warning message when saving to remind you of it.
Last modified: Monday, 18 May 2026, 12:31 PM